Режим работы на майские праздники:
27 апреля и 2,3,6,7,8 мая - с 11:00 до 18:00
28,29,30 апреля и 1,4,5,9,10,11,12 мая - не работаем.
С 13 мая - по обычному расписанию.
Режим работы пункта самовывоза:
Пн-пт 10:00-21:00, сб-вс 10:00-19:00.
Колл центр работает с 10 до 18 по будням.


- Описание
- Характеристики
- Отзывы (0)
Полётный контроллер Matek H743-WLITE компании Mateksys
(STM32H743VIH6, ICM42688-P, DPS310, OSD, 7x UARTs, 1x CAN, 2x I2C, 12x PWM outputs, 3x BEC)


FC Specifications
- MCU: STM32H743VIH6, 480MHz , 512KB RAM, 2MB Flash
- IMU: ICM42688-P
- Baro: DPS310 (I2C2)
- OSD: AT7456E
- Blackbox: MicroSD card slot (SDIO)
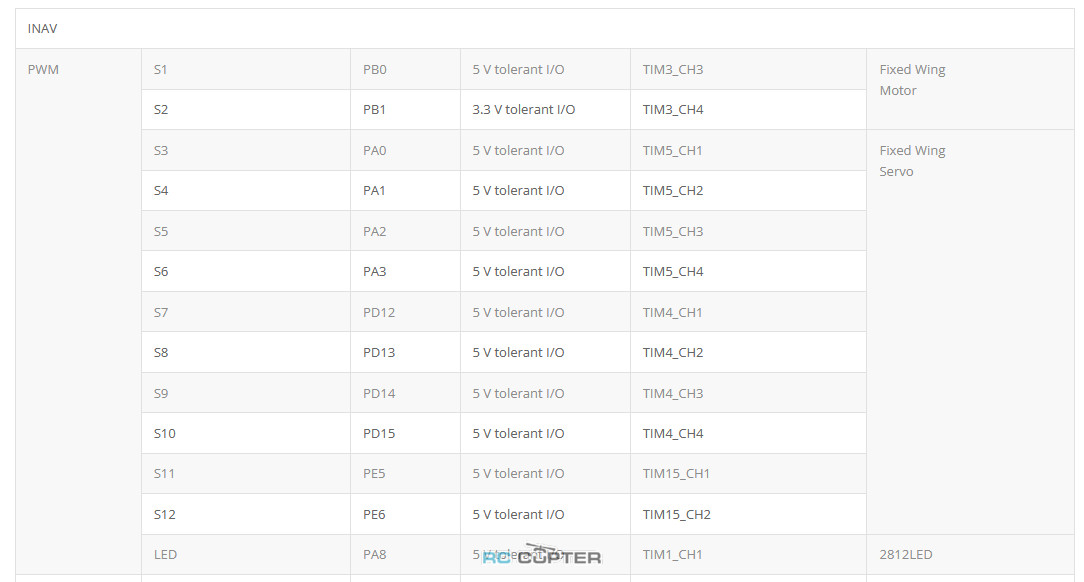
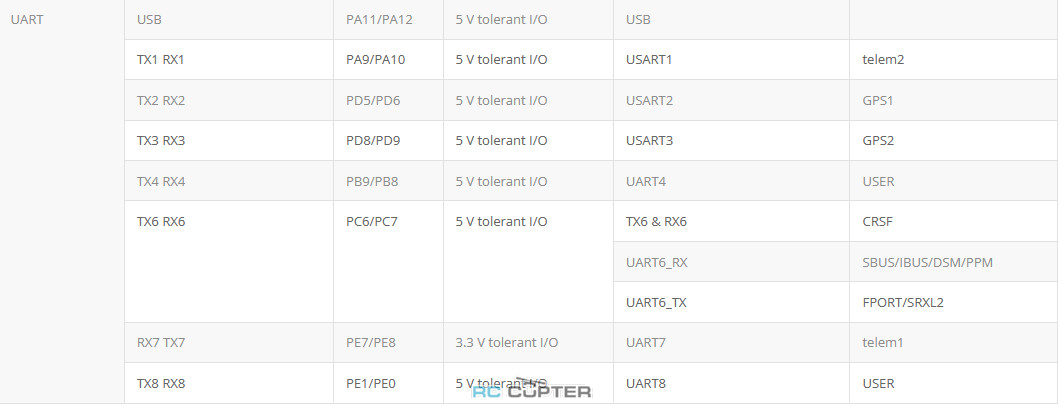
- 7x Uarts (1,2,3,4,6,7,8) with built-in inversion.
- 13x PWM outputs(12+LED)
- 6x ADC (VBAT, Current, RSSI, Analog AirSpeed, VB2, CU2)
- 3x LEDs for FC STATUS (Blue, Red) and 3.3V indicator(Red)
- 2x I2C
- 1x CAN
- USB/Beep Extender with Type-C(USB2.0)
- Dual Camera Inputs switch
- 9V(12V) for VTX power switch
- High-precision Current Sense, 220A range
- ADC VB2 voltage divider: 1K:20K
- ADC AirSpeed voltage divider: 20K:20K
FC Firmware
- INAV: MATEKH743
- ArduPilot: MATEKH743
PDB
- Input voltage range: 6.8~30V (2~6S LiPo)
- 1x ESC power pads
- Battery Voltage divider 1K:20K (Scale 2100 in INAV, BATT_VOLT_MULT 21.0 in ArduPilot)
- Current Senor: 220A, 3.3V ADC (Scale 150 in INAV, 66.7 A/V in ArduPilot)
- Sense resistor: 90A continuous, 220A peak
BEC 5V output
- Designed for Flight controller, Receiver, OSD, Camera, Buzzer, 2812 LED_Strip, Buzzer, GPS module, AirSpeed
- Continuous current: 2 Amps, Max.3A
BEC 9V /12V output
- Designed for Video Transmitter, Camera, Gimbal ect.
- Continuous current: 2 Amps, Max.3A
- 12V option with Jumper pad
- for stable 9V/12V output, input voltage should > output voltage +1V
BEC Vx output
- Designed for Servos
- Voltage adjustable, 5V Default, 6V or 7.2V via jumper
- Continuous current: 8 Amps, Max.10A
- for stable Vx output, input voltage should > Vx voltage +1V
BEC 3.3V output
- Designed for Baro / Compass module and external 3.3V peripherals
- Linear Regulator
- Continuous current: 200mA
Сравнительная таблица полётных контроллеров Matek
Размеры:
- Крепление: 25 x 25 мм, Φ2 мм
- Размеры: 44 x 29 x 14,5 мм
- Вес: 22 г с адаптером USB/зуммер
Комплектация:
- 1x H743-WLITE
- 1x Удлинитель USB(Type-C)/Beep (пассивный зуммер)
- 1x 20-см кабель JST-SH-6P - JST-SH-6P для USB-удлинителя.
- 2x 20-см кабель JST-GH-4P - JST-GH-4P для порта CAN и I2C
- 1x конденсатор Rubycon ZLH 35V 470uF
- Штырьки Dupont 2.54 (плата поставляется без распайки)


RC INPUT
The Rx6 pin, which by default is mapped to a timer input, can be used for all ArduPilot supported receiver protocols, except CRSF which requires a true UART connection. However, bi-directional protocols which include telemetry, such as SRXL2 and FPort, when connected in this manner, will only provide RC without telemetry.
To allow CRSF and embedded telemetry available in Fport, CRSF, and SRXL2 receivers, the Rx6 pin can also be configured to be used as true UART RX pin for use with bi-directional systems by setting the BRD_ALT_CONFIG to “1” so it becomes the SERIAL7 port’s RX input pin.
With this option, SERIAL7_PROTOCOL must be set to “23”, and:
- PPM is not supported.
- SBUS/DSM/SRXL connects to the Rx6 pin, but SBUS requires that the SERIAL7_OPTIONS be set to “3”.
- FPort requires connection to Tx6 and SERIAL7_OPTIONS be set to “7”. If Telemetry doesn’t work, try set SERIAL7_OPTIONS = 135.
- CRSF also requires a Tx6 connection, in addition to Rx6, and automatically provides telemetry. Set SERIAL7_OPTIONS to “0”.
- SRXL2 requires a connection to Tx6 and automatically provides telemetry. Set SERIAL7_OPTIONS to “4”.
Any UART can be used for RC system connections in ArduPilot also, and is compatible with all protocols except PPM. See Radio Control Systems for details.
–
ArduPilot Relay(PINIO)
- Camera-1 and Vsw On by default
- Make sure 2 cameras are set with identical video format, both PAL or both NTSC.
# GPIOs
- PD10 PINIO1 OUTPUT GPIO(81) //9Vsw pad power switch
- PD11 PINIO2 OUTPUT GPIO(82) //Camera switch
# RCx_OPTION: RC input option
- 28 Relay On/Off
- 34 Relay2 On/Off
- 35 Relay3 On/Off
- 36 Relay4 On/Off
e.g.
- RELAY_PIN 81 //9Vsw GPIO
- RC7_OPTION 28 //Relay On/Off, Use CH7 of Transmitter to switch 9Vsw
- RELAY_PIN2 82 //Camera switch GPIO
- RC8_OPTION 34 //Relay2 On/Off, Use CH8 of Transmitter to switch camera
The configured feature will be triggered when the auxiliary switch’s pwm value becomes higher than 1800. It will be deactivated when the value falls below 1200.
Check the pwm value sent from the transmitter when the switch is high and low using the Mission Planner’s Initial Setup >> Mandatory Hardware >> Radio Calibration screen. If it does not climb higher than 1800 or lower than 1200, it is best to adjust the servo end points in the transmitter.
- STM32H743VIH6 vs STM32F765VIH6
- RX4/TX4 vs RX5
- Other components and layout are identical.
- 220A Current sensor on H743-WLITE, , BATT_AMP_PERVLT to 66.7
- 1k:20k voltage divider for battery voltage sense on H743-WLITE, BATT_VOLT_MULT 21
- Supported since Arduplane 4.2
- It is recommended to use STM32CubeProgrammer to erase MCU and upload firmware. check this blog http://www.mateksys.com/?p=6905
- 220A Current sensor on H743-WLITE, set current_meter_scale = 150
- 1k:20k voltage divider for battery voltage sense on H743-WLITE, set vbat_scale = 2100
- H743-WLITE is not supported by INAV4.1 or older downloaded from configurator. pls download inav_4.1.0_MATEKH743_42688 from our website.
- Starting with INAV5.0, you may download firmware directly from INAV configurator.
- If the ESCs you are using don’t have enough capacitors integrated, low ESR electrolytic capacitor is required for reducing ESC noise.
Download STM32CubeProgrammer from ST website https://www.st.com/en/development-tools/stm32cubeprog.html
ArduPilot firmware: https://firmware.ardupilot.org/
————————————————————————————————-
Make sure DFU driver has been installed. Check out “Install DFU Drivers” in this page
Connect the FC USB to computer while holding the boot button in.
- Select USB
- USB1 and click Refresh
- Connect
- select “Erasing & Programming”
- Click “Full chip erase”
- Browse the hex or bin file from your computer, if flashing ardupilot, use “ardu*_with_bl.hex“. (MUST BE “with_bl”, bootloader)
- Click “Start Programming”
- After programming, unplug USB and plug USB back in. FC will boot and run in normal COM mode.


| Производитель: | Matek |


")
